Important readings about major developments on Samba 4 : https://www.samba.org/samba/news/releases/4.0.0.html
The following are my compilations on setting up a working active directory server using Samba 4 on Ubuntu Server 64-bit 12.04.1 LTS
Initial Configuration
Samba Version: Samba-4.0.5
OS: Ubuntu Server 64-bit 12.04.1 LTS
GUI Installed? No
Hostname: dc1
Domain: mySamba.local
IP Address: 192.168.1.3
gateway: 192.168.1.1
Throughout the steps, I login as root. If you have not configure your network interface, it maybe configure to receive IP from your DHCP router/server by default. you may verify the settings by typing # vi /etc/network/interfaces
Step 1: Install updates and required packages. Note that it will take some time to install these packages.
$ apt-get install build-essential libacl1-dev libattr1-dev libblkid-dev libgnutls-dev libreadline-dev python-dev python-dnspython gdb pkg-config libpopt-dev libldap2-dev dnsutils libbsd-dev attr krb5-user docbook-xsl libcups2-dev quota vim vim-scripts vim-doc vim-latexsuite vim-gui-common vim-gnome <enter>
Step 2: Download and install samba 4 packages
$ wget http://ftp.samba.org/pub/samba/samba-4.0.4.tar.gz <enter>
This will download the file to the current working directory. Extract the file using the command below.
$ tar -zxvf samba-4.0.5.tar.gz <enter>
Enter the samba-4.0.5 directory and type the following commands:
$ .\configure <enter>
$ make <enter>
$ make install <enter>
Note that the process for each command will take time.
Step 3: Modify network interface, hosts, hostname and resolv.conf file. Since VIM was already installed, I recommend using it than the VI editor. Type the command below:
$ vim /etc/network/interfaces <enter>
Follow the configuration and adjust it according to your current network setup
auto lo eth0
iface lo inet loopback
iface eth0 inet static
address 192.168.1.3
netmask 255.255.255.0
network 192.168.1.0
broadcast 192.168.1.255
gateway 192.168.1.1
dns-nameservers 192.168.1.3 192.168.1.1
dns-domain dc1.mySamba.local
Save the file and exit VIM editor. Edit also the hosts file by typing the command below:
$ vim /etc/hosts <enter>
127.0.0.1 localhost
192.168.1.3 dc1 dc1.mySamba.local
Save the file and exit VIM editor. Edit also the hostname file by typing the command below:
$ vim /etc/hostname <enter>
dc1
Save the file and exit VIM editor. Edit also the hostname file by typing the command below:
$ vim /etc/resolv.conf <enter>
nameserver 127.0.0.1
search dc1.mySamba.local
Reboot Ubuntu Server to make sure the changes takes effect. Type the command below to reboot:
$ reboot <enter>
Step 4: Run Samba 4 provision.
On the command prompt, type the following command: $ /usr/local/samba/sbin/samba-tool domain provision
Realm: mySamba.local <enter>
Domain [mySamba]: <enter>
Server Role (dc, member, standalone) [dc]: <enter>
DNS Backend (SAMBA_INTERNAL, BIND9_FLATFILE, BIND9_DLZ, NONE) [SAMBA_INTERNAL]: <enter>
DNS forwarder IP address (write 'none' to disable forwarding): 192.168.1.1 <enter>
Administrator password:
Retype password:
Remember to type a strong password like Pa$$w0rd in order that the provision will work. Please click the Samba HowTo under the reference about this issue.
192.168.1.1 is the IP address of my firewall, I also configure the DHCP service to give out DNS 192.168.1.3 and the public DNS which comes from our DSL provider. In this case, you don't have to modify network interface settings of windows 7 or 8 client in order to join the domain.
After the provision, run samba by typing the command:
$ /usr/local/samba/sbin/samba <enter>
Step 5: Testing Samba Server
5.1. To show the list of shares in your domain controller. Type the command:
$ /usr/local/samba/bin/smbclient -L localhost -U% <enter>
The output should be similar to the one below:
Sharename Type Comment
--------- ---- -------
netlogon Disk
sysvol Disk
IPC$ IPC IPC Service (Samba 4.0.5)
5.2. Testing authentication
$ /usr/local/samba/bin/smbclient //localhost/netlogon -UAdministrator%'pa$$w0rd' -c 'ls' <enter>
Domain=[mySamba] OS=[Unix] Server=[Samba 4.0.5]
. D 0 Tue Apr 9 02:17:13 2013
. . D 0 Tue Apr 9 02:17:31 2013
50242 blocks of size 1023475. 63234 blocks available
If anything fails, type the following command below to restart samba and test the server again.
$ kill samba <enter>
$ /usr/local/samba/sbin/samba <enter>
5.3. Testing Internal DNS
$ host -t SRV _ldap._tcp.mySamba.local <enter>
_ldap._tcp.mySamba.local has SRV record 0 100 340 dc1.mySamba.local.
$ host -t SRV _kerberos._udp.mySamba.local <enter>
_kerberos._udp.mySamba.local has SRV record 0 100 89 dc1.mySamba.local.
$ host -t A mySamba.local <enter>
mySamba.local has address 192.168.1.3
If all the command output is similar to the one shown above, meaning your samba 4 internal DNS is working.
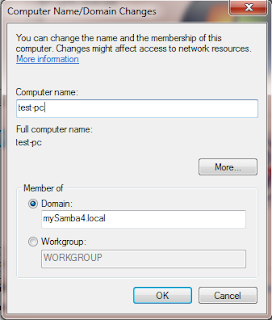
6. Join Windows 7 or 8 client into the domain.
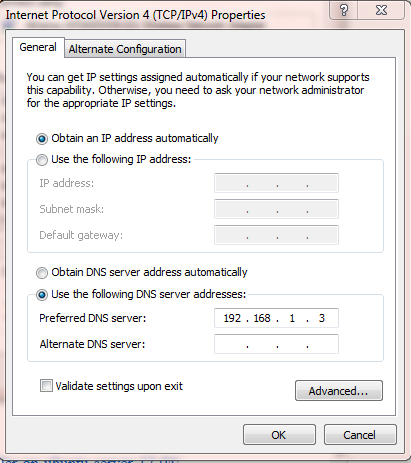
Make sure that your DHCP server has added DNS entry pointing to the samba 4 server, if not then add the IP address of your samba 4 DC manually in one of the DNS entry of the Windows client interface you wish to join the domain.

Join the windows client into the domain. Enter administrator and the password in the authentication box and after that the system will reboot.
In one of the Windows Client Domain Member, login as Administrator and install RSAT or Remote System Administration Tool. By this tool you can administer users and group policy for your domain.
In my next posting, I will show how to create home folders for users at the same time, group share.
Please refer to the reference for troubleshooting and further readings.
Reference:
http://paulcolfer.ie/os/linux/samba-4-domain-controller-on-ubuntu-server-12-04/
http://wiki.samba.org/index.php/Samba_AD_DC_HOWTO
The following are my compilations on setting up a working active directory server using Samba 4 on Ubuntu Server 64-bit 12.04.1 LTS
Initial Configuration
Samba Version: Samba-4.0.5
OS: Ubuntu Server 64-bit 12.04.1 LTS
GUI Installed? No
Hostname: dc1
Domain: mySamba.local
IP Address: 192.168.1.3
gateway: 192.168.1.1
Throughout the steps, I login as root. If you have not configure your network interface, it maybe configure to receive IP from your DHCP router/server by default. you may verify the settings by typing # vi /etc/network/interfaces
Step 1: Install updates and required packages. Note that it will take some time to install these packages.
$ apt-get install build-essential libacl1-dev libattr1-dev libblkid-dev libgnutls-dev libreadline-dev python-dev python-dnspython gdb pkg-config libpopt-dev libldap2-dev dnsutils libbsd-dev attr krb5-user docbook-xsl libcups2-dev quota vim vim-scripts vim-doc vim-latexsuite vim-gui-common vim-gnome <enter>
Step 2: Download and install samba 4 packages
$ wget http://ftp.samba.org/pub/samba/samba-4.0.4.tar.gz <enter>
This will download the file to the current working directory. Extract the file using the command below.
$ tar -zxvf samba-4.0.5.tar.gz <enter>
Enter the samba-4.0.5 directory and type the following commands:
$ .\configure <enter>
$ make <enter>
$ make install <enter>
Note that the process for each command will take time.
Step 3: Modify network interface, hosts, hostname and resolv.conf file. Since VIM was already installed, I recommend using it than the VI editor. Type the command below:
$ vim /etc/network/interfaces <enter>
Follow the configuration and adjust it according to your current network setup
auto lo eth0
iface lo inet loopback
iface eth0 inet static
address 192.168.1.3
netmask 255.255.255.0
network 192.168.1.0
broadcast 192.168.1.255
gateway 192.168.1.1
dns-nameservers 192.168.1.3 192.168.1.1
dns-domain dc1.mySamba.local
Save the file and exit VIM editor. Edit also the hosts file by typing the command below:
$ vim /etc/hosts <enter>
127.0.0.1 localhost
192.168.1.3 dc1 dc1.mySamba.local
Save the file and exit VIM editor. Edit also the hostname file by typing the command below:
$ vim /etc/hostname <enter>
dc1
Save the file and exit VIM editor. Edit also the hostname file by typing the command below:
$ vim /etc/resolv.conf <enter>
nameserver 127.0.0.1
search dc1.mySamba.local
Reboot Ubuntu Server to make sure the changes takes effect. Type the command below to reboot:
$ reboot <enter>
Step 4: Run Samba 4 provision.
On the command prompt, type the following command: $ /usr/local/samba/sbin/samba-tool domain provision
Realm: mySamba.local <enter>
Domain [mySamba]: <enter>
Server Role (dc, member, standalone) [dc]: <enter>
DNS Backend (SAMBA_INTERNAL, BIND9_FLATFILE, BIND9_DLZ, NONE) [SAMBA_INTERNAL]: <enter>
DNS forwarder IP address (write 'none' to disable forwarding): 192.168.1.1 <enter>
Administrator password:
Retype password:
Remember to type a strong password like Pa$$w0rd in order that the provision will work. Please click the Samba HowTo under the reference about this issue.
192.168.1.1 is the IP address of my firewall, I also configure the DHCP service to give out DNS 192.168.1.3 and the public DNS which comes from our DSL provider. In this case, you don't have to modify network interface settings of windows 7 or 8 client in order to join the domain.
After the provision, run samba by typing the command:
$ /usr/local/samba/sbin/samba <enter>
Step 5: Testing Samba Server
5.1. To show the list of shares in your domain controller. Type the command:
$ /usr/local/samba/bin/smbclient -L localhost -U% <enter>
The output should be similar to the one below:
Sharename Type Comment
--------- ---- -------
netlogon Disk
sysvol Disk
IPC$ IPC IPC Service (Samba 4.0.5)
5.2. Testing authentication
$ /usr/local/samba/bin/smbclient //localhost/netlogon -UAdministrator%'pa$$w0rd' -c 'ls' <enter>
Domain=[mySamba] OS=[Unix] Server=[Samba 4.0.5]
. D 0 Tue Apr 9 02:17:13 2013
. . D 0 Tue Apr 9 02:17:31 2013
50242 blocks of size 1023475. 63234 blocks available
If anything fails, type the following command below to restart samba and test the server again.
$ kill samba <enter>
$ /usr/local/samba/sbin/samba <enter>
5.3. Testing Internal DNS
$ host -t SRV _ldap._tcp.mySamba.local <enter>
_ldap._tcp.mySamba.local has SRV record 0 100 340 dc1.mySamba.local.
$ host -t SRV _kerberos._udp.mySamba.local <enter>
_kerberos._udp.mySamba.local has SRV record 0 100 89 dc1.mySamba.local.
$ host -t A mySamba.local <enter>
mySamba.local has address 192.168.1.3
If all the command output is similar to the one shown above, meaning your samba 4 internal DNS is working.
6. Join Windows 7 or 8 client into the domain.
Make sure that your DHCP server has added DNS entry pointing to the samba 4 server, if not then add the IP address of your samba 4 DC manually in one of the DNS entry of the Windows client interface you wish to join the domain.
Join the windows client into the domain. Enter administrator and the password in the authentication box and after that the system will reboot.

In one of the Windows Client Domain Member, login as Administrator and install RSAT or Remote System Administration Tool. By this tool you can administer users and group policy for your domain.
In my next posting, I will show how to create home folders for users at the same time, group share.
Please refer to the reference for troubleshooting and further readings.
Reference:
http://paulcolfer.ie/os/linux/samba-4-domain-controller-on-ubuntu-server-12-04/
http://wiki.samba.org/index.php/Samba_AD_DC_HOWTO
Thanks a lot..
ReplyDeleteinstall samba on ubuntu 12.04